
4. Examples
Example 1 : my first coroutine
For our first example, let’s start with something simple to illustrate how coroutines run in a different order from which they are written :
fun main() {
    println("Starting a coroutine block...")
    runBlocking {
        println(" Coroutine block started")
        launch {
            println("  1/ First coroutine start")
            delay(100)
            println("  1/ First coroutine end")
        }
        launch {
            println("  2/ Second coroutine start")
            delay(50)
            println("  2/ Second coroutine end")
        }
        println(" Two coroutines have been launched")
    }
    println("Back from the coroutine block")
}
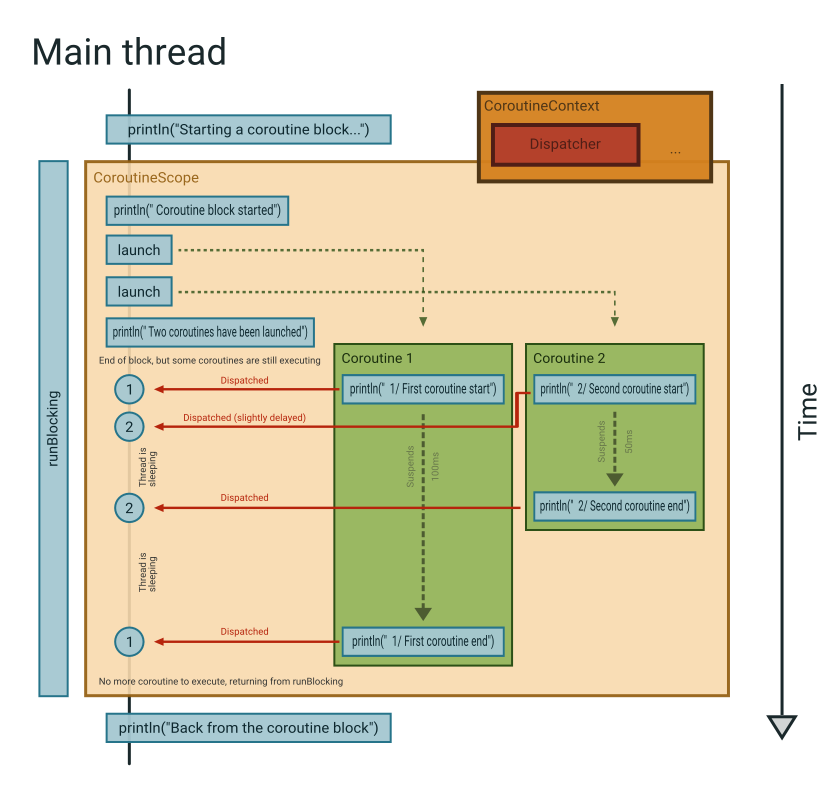
Starting a coroutine block…
 Coroutine block started
 Two coroutines have been launched
  1/ First coroutine start
  2/ Second coroutine start
  2/ Second coroutine end
  1/ First coroutine end
Back from the coroutine block
Let’s analyze what is going on here.
main() calls runBlocking() which, as we saw, executes the block we give to it into the context of a new coroutine scope. This means that inside the curly braces, there is an implicit this that points to this new CoroutineScope, and we can call its methods such as launch() directly. runBlocking() doesn’t return until every coroutine inside its scope has completed (which is why it is “blocking”).
Inside this scope, we launch two new coroutines (which means we have three coroutines in total, the two new “inner” coroutines are children of the first “outer” coroutine created by runBlocking()). The first one prints something, suspends for 100ms using delay(), then prints something else. The second one does the same thing, but with a 50ms suspending delay.
When the outer coroutine calls launch() without specifying a dispatcher, the new inner coroutine is created in the current dispatcher, but doesn’t execute immediately : it has to wait for the outer coroutine to suspend (or complete) before the dispatcher has the opportunity to execute it in the thread. This is why “Two coroutines have been launched” is printed before “1/ First coroutine start”. Then, we see the outputs of the inner coroutines intertwined, as expected thanks to delay().
Here is a diagram that should help visualize the situation more clearly :
Example 2 : non-concurrency
I insisted quite a bit on the fact that coroutines are not concurrent, let’s prove it. We take a similar example as the previous one, but this time, one of the coroutine will be doing some work :
fun main() {
    runBlocking {
        launch {
            println("First coroutine start, suspend for 50ms")
            delay(50)
            println("First coroutine : starting some computation for 100ms")
            val t0 = System.currentTimeMillis()
            while (System.currentTimeMillis() - t0 < 100) {
                // Simulate a computation taking 100ms by wasting
                // CPU cycles in this loop
                // We could also use Thread.sleep()
            }
            println("Computation ended")
        }
        launch {
            println("Second coroutine start, suspend for 100ms")
            val time = measureTimeMillis {
                delay(100)
            }
            println("Second coroutine end after ${time}ms")
        }
    }
}
The output shows that the delay of 100ms in the second coroutine actually takes 150ms, because the first coroutine is monopolizing the thread :
First coroutine start, suspend for 50ms
Second coroutine start, suspend for 100ms
First coroutine : starting some computation for 100ms
Computation ended
Second coroutine end after 149ms
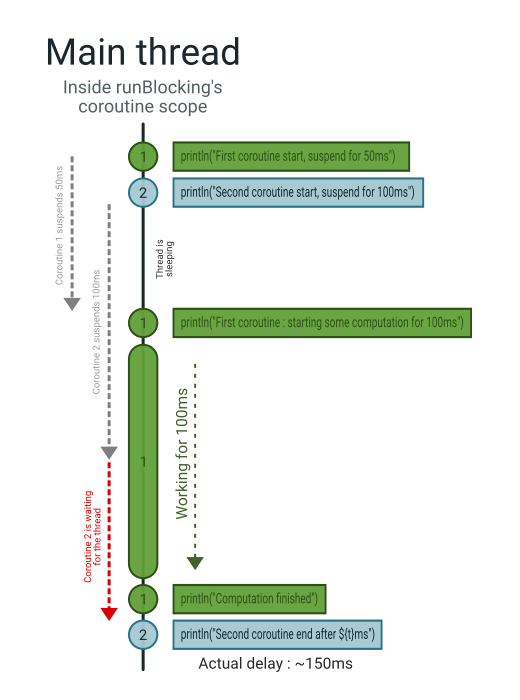
What these first two examples show is that, when run in a single thread, coroutines are not good for computation-heavy tasks. However, they are great for tasks that need only to do small operations spaced by large delays of inactivity. These kind of tasks include waiting for a resource to become available, waiting for the response to an API request, updating something on your UI at regular interval, …
For more intensive tasks, the next 2 examples show alternative methods that solve this issue.
Example 3 : yielding
If you don’t mind about waiting a bit more for the result of the computation and you want to keep the simplicity of a single thread, one possibility is to make sure your computation algorithm regularly yields. Here, yielding means voluntarily giving back control to the dispatcher in order to give it the opportunity to resume another coroutine that is waiting for execution. This is simply done by calling yield(). If there is no other coroutine waiting, the computation is resumed immediately.
fun example3() {
    runBlocking {
        launch {
            println("First coroutine start, suspend for 50ms")
            delay(50)
            println("First coroutine : starting some yielding computation for 100ms")
            val t0 = System.currentTimeMillis()
            while (System.currentTimeMillis() - t0 < 100) {
                // Simulate some work but yield thread
                // execution as often as possible
                Thread.sleep(1)
                yield()
            }
            println("Computation ended")
        }
        launch {
            println("Second coroutine start, suspend for 100ms")
            val time = measureTimeMillis {
                delay(100)
            }
            println("Second coroutine end after ${time}ms")
        }
    }
}
First coroutine start, suspend for 50ms
Second coroutine start, suspend for 100ms
First coroutine : starting some yielding computation for 100ms
Second coroutine end after 102ms
Computation ended
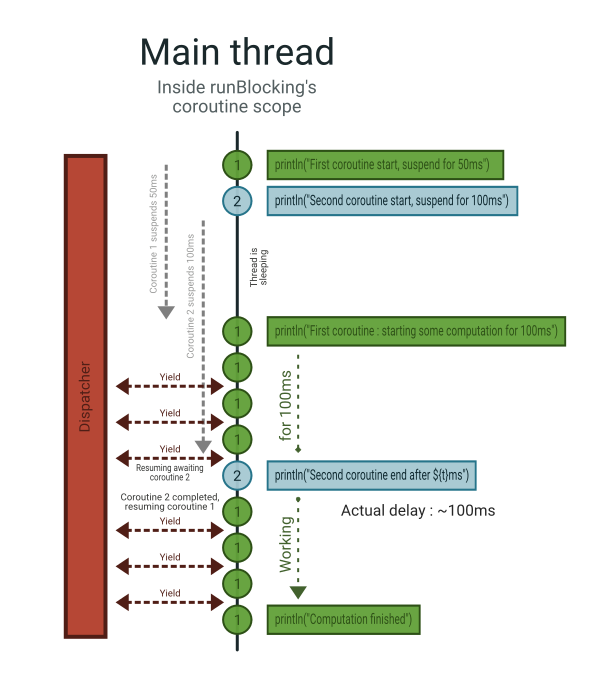
As you can see on the output, it behaves as expected, and in some cases it can be an interesting solution. However, it is not the most efficient, because we could offload the computation to another CPU core and make sure our main thread (or another yielding computation coroutine) will not be slowed down by it. Also, this only works if you have complete control over the computation algorithm : if you are calling a long-running blocking function in an external library, you will not be able to make it yield regularly. For these cases, we need another thread.
Example 4 : multi-threading
One of the interesting things about coroutines is how easy it is to move them from one thread to another. We just need to specify another dispatcher to the coroutine builder (functions such as runBlocking() or launch() are called coroutine builders), and the coroutine will be dispatched to other threads accordingly, as we saw previously in the paragraph about dispatchers. As a reminder, Dispatchers.Default for instance executes its coroutines in a pool of background threads that it manages.
Let’s look at the following example which illustrates how this works :
fun main() {
    repeat(2) { i ->
        println("#$i Starting a coroutine block from thread ${Thread.currentThread().name}")
        val time = measureTimeMillis {
            runBlocking(Dispatchers.Default) {
                println(" #$i Coroutine block started in thread ${Thread.currentThread().name}")
                launch {
                    println(" #$i First coroutine started in thread ${Thread.currentThread().name}")
                    Thread.sleep(100) // Simulate some work
                    println(" #$i First coroutine end")
                }
                launch {
                    println(" #$i Second coroutine started in thread ${Thread.currentThread().name}")
                    Thread.sleep(50) // Simulate some work
                    println(" #$i Second coroutine end")
                }
            }
        }
        println("#$i Back from the coroutine block in thread ${Thread.currentThread().name} after ${time}ms")
    }
}
#0 Starting a coroutine block from thread main
 #0 Coroutine block started in thread DefaultDispatcher-worker-1
 #0 First coroutine started in thread DefaultDispatcher-worker-2
 #0 Second coroutine started in thread DefaultDispatcher-worker-3
 #0 Second coroutine end
 #0 First coroutine end
#0 Back from the coroutine block in thread main after 299ms
#1 Starting a coroutine block from thread main
 #1 Coroutine block started in thread DefaultDispatcher-worker-2
 #1 First coroutine started in thread DefaultDispatcher-worker-3
 #1 Second coroutine started in thread DefaultDispatcher-worker-1
 #1 Second coroutine end
 #1 First coroutine end
#1 Back from the coroutine block in thread main after 102ms
There are a few notable changes from the last example :
Dispatchers.Defaultis passed torunBlockingin order to attach this dispatcher to the coroutine context inside the new coroutine scope- We use
Thread.currentThread().nameto display where each block of code is executed Thread.sleep()is used instead ofdelay()to simulate some heavy computation which blocks the thread and isn’t able to yield- The time taken by the whole runBlocking block (running the two sub-coroutines) is measured and printed at the end
repeat()is used to execute the same example twice
In the output, we observe some interesting details :
- Even though
runBlocking()executes its coroutine inside (an)other thread(s), it still suspends the current (main) thread. - Every coroutine (the one directly started by
runBlocking()and the two sub-coroutines started withlaunch()) runs concurrently in a different thread, calledDefaultDispatcher-worker-N. - This is also apparent in the last line of the output : running both coroutines with non-suspending work of 150ms in total only takes 100ms, which proves they executed concurrently.
- This speed is only visible in the second try : on the first try, running the block took 300ms, way more than expected. This is because the dispatcher needs to create those worker threads in order to run the coroutines, and creating a thread is not cheap. Fortunately, once a coroutine completes and its thread is no longer needed, it is kept sleeping and reused when needed, which is why the second run used those same threads in a random order, and took the expected amount of time without overhead.
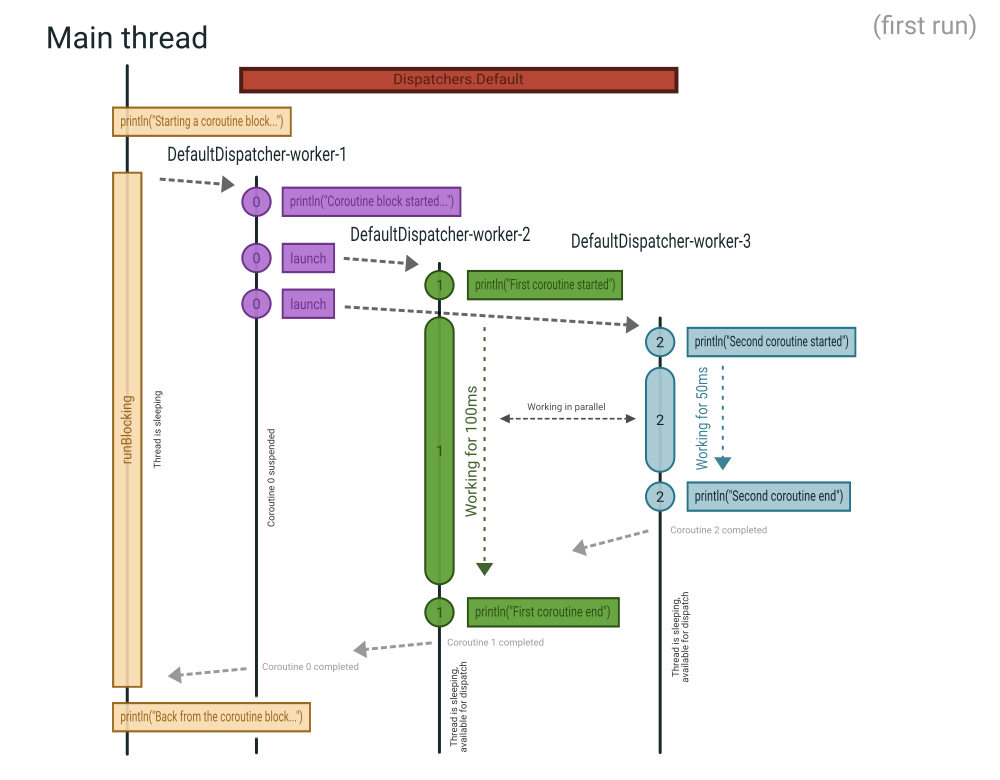
Our code works as expected, but don’t forget that since we are now executing code in multiple concurrent threads, we should be careful about the same concurrency issues that we saw earlier. Again, coroutines do not intrinsically shield you from this. However, when used in a smart way, they can help a great deal, as illustrated in the next example.
Example 5 : context switching
Concurrency issues appear when multiple threads try to access the same resource at the same time. But what if every resource was only accessed by a single thread? This should solve the issue. You will be glad to hear that not only it does, but coroutines make it easy to design your concurrency around this rule.
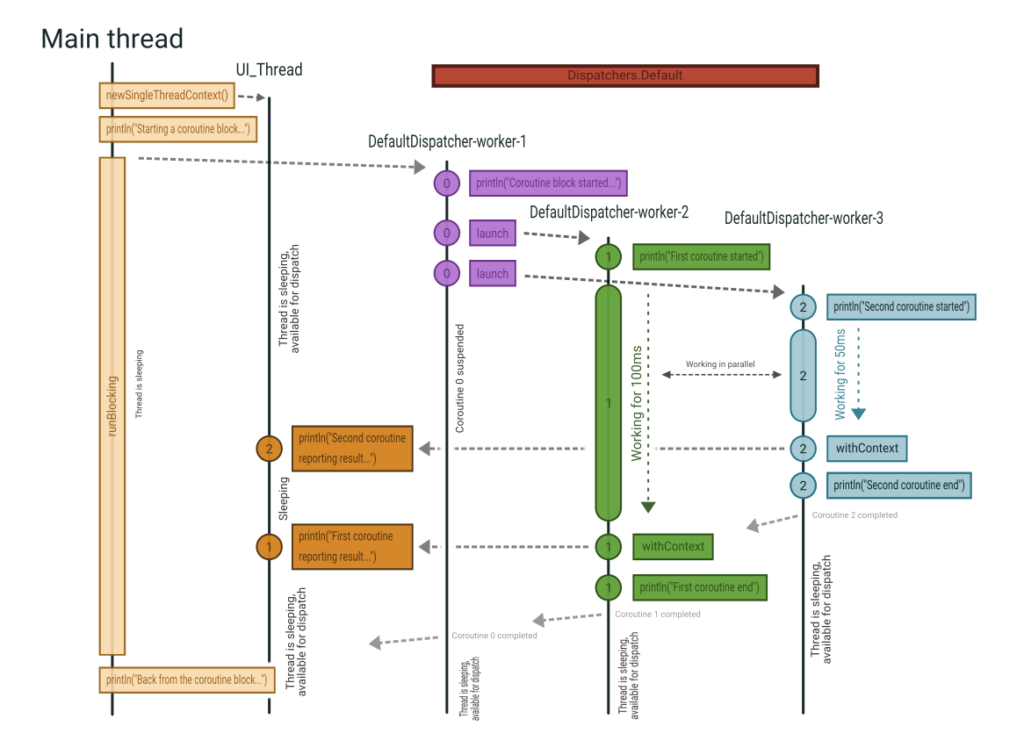
Let’s imagine we have a main thread running the UI of our application inside a coroutine scope. This would be provided by your UI framework (Android does for instance), but for this example, we will emulate this by creating a new coroutine context with an ad-hoc dispatcher that creates a new thread to run its coroutines into. This sounds complicated, but fortunately it only requires a single function call : newSingleThreadContext(); we simply need to pass the name of the new thread that will be created. Then, we will keep the two computing coroutines from the previous example and we imagine we want to display the result of each of them to the user. Since the UI can only be accessed from the UI thread, we need to execute the “update the GUI” code in the main thread once the computation is finished. How? Simple : by launching a new coroutine in this context !
fun main() {
    val uiContext = newSingleThreadContext("UI_Thread")
    println("Starting a coroutine block from thread ${Thread.currentThread().name}")
    runBlocking(Dispatchers.Default) {
        println(" Coroutine block started in thread ${Thread.currentThread().name}")
        launch {
            println("  First coroutine started in thread ${Thread.currentThread().name}")
            Thread.sleep(100) // Simulate some work
            val computationResult = 29
            launch(uiContext) {
                println("   First coroutine reporting result=$computationResult to the UI in thread ${Thread.currentThread().name}")
            }
            println("  First coroutine end")
        }
        launch {
            println("  Second coroutine started in thread ${Thread.currentThread().name}")
            Thread.sleep(50) // Simulate some work
            val computationResult = 13
            launch(uiContext) {
                println("   Second coroutine reporting result=$computationResult to the UI in thread ${Thread.currentThread().name}")
            }
            println("  Second coroutine end")
        }
    }
    println(" Back from the coroutine block in thread ${Thread.currentThread().name}")
    uiContext.close()
}
Starting a coroutine block from thread main
 Coroutine block started in thread DefaultDispatcher-worker-1
  First coroutine started in thread DefaultDispatcher-worker-2
  Second coroutine started in thread DefaultDispatcher-worker-3
  Second coroutine end
   Second coroutine reporting result=13 to the UI in thread UI_Thread
  First coroutine end
   First coroutine reporting result=29 to the UI in thread UI_Thread
Back from the coroutine block in thread main
As you can see, we successfully updated the UI when the two computations finished, in a thread-safe manner. Notice however how the new coroutines (the ones updating the UI) execute after the parent coroutine has already ended (“First coroutine end” is printed before “First coroutine reporting result to the UI…”) : this is to be expected since launch() creates a coroutine asynchronously, without waiting for it to complete. This can be a good thing, or not, depending on your expectations. If, instead, we wanted to execute this block of code synchronously, it would only require to replace launch() with another function : withContext(). Instead of creating a new coroutine that will be executed at some point in the future, this function switches the execution of the current coroutine to another coroutine context. If this context is tied to another thread and this thread is currently busy, the coroutine will be suspended until the thread is available.
            withContext(uiContext) {
                println("   First coroutine reporting result=$computedResult to the UI in thread ${Thread.currentThread().name}")
            }
“First coroutine reporting result” and “First coroutine end” are now in the correct order :
  First coroutine started in thread DefaultDispatcher-worker-2
  Second coroutine started in thread DefaultDispatcher-worker-3
   Second coroutine reporting result=13 to the UI in thread UI_Thread
  Second coroutine end
   First coroutine reporting result=29 to the UI in thread UI_Thread
  First coroutine end
Example 6 : sub-scope
Finally, let’s take a quick look at how to improve the safety and modularity of our code with finer-grained structured concurrency. runBlocking() creates a new coroutine scope, but it is sometimes convenient to create new, smaller scopes for a handful of coroutines. This is done simply using the coroutineScope() function :
fun example6() {
    runBlocking {

        println("Doing something...")

        println("Creating a new coroutine scope containing two coroutines")
        coroutineScope {
            launch {
                println(" 1/ First coroutine start")
                delay(100)
                println(" 1/ First coroutine end")
            }
            launch {
                println(" 2/ Second coroutine start")
                delay(50)
                println(" 2/ Second coroutine end")
            }
        }
        println("End of the new coroutine scope")

        println("Doing something else...")

    }
}
Doing something…
Creating a new coroutine scope containing two coroutines
1/ First coroutine start
2/ Second coroutine start
2/ Second coroutine end
1/ First coroutine end
End of the new coroutine scope
Doing something else…
Defining new coroutine scopes on the spot whenever necessary offers other advantages as well : for example, if one of the tasks fails and throws an exception, the whole scope is cancelled, including the sibling coroutine which is supposedly not needed anymore. The cancellation scope can be restrained by catching the exceptions as necessary, as explained in the documentation.
That’s it ! Thank you for reading to the end, I hope this introduction to Kotlin’s coroutines (which was way longer than I had anticipated) was able to help you understand this interesting mechanism. Of course, there is a lot more to coroutines, that you can find all about in the official documentation, but hopefully you are now better armed to apprehend these more advanced topics. If you have remarks about this guide, feel free to leave them in the comments below.
Very, very nice article! Many thanks!
It would be very nice to learn more about exception handling in coroutines!
Great article. I love that your examples also cover blocking calls like Thread.sleep and how specifying the dispatcher helps in this case. This would have helped me a lot when I first started working with coroutines!
This is by far one of the BEST introductions to coroutines I’ve read. I’ve shared this with my ream at work.
Thank you for putting this together. The diagrams are amazing! I love how you build intuition, I’ve been wanted to put something like this together for some time but I don’t think I could have done such a good job.
Small nitpick:
In this sentence:
>> “it would only require to change launch() for another coroutine builder : withContext()”
Calling withContext() a coroutine *builder* can be misleading, as doesn’t actually create a new coroutine, it just changes the scheduler (or context should I say). https://pl.kotl.in/T-XZv31xL
>> “This function suspends the current coroutine while the code inside its block is executed.”
Again, there’s only one coroutine 🙂 just in a different context. And the coroutine doesn’t suspend get suspended when calling `withContext` (might suspend later tho)
Hi Fernando, thanks for the comment and the suggestions !
I checked again the doc of withContext and indeed, I had misunderstood its behavior. I think I was mislead by the part that says “suspends until it completes”, which at first I thought meant that the current coroutine was suspended and implicitly that a new one was created. I fixed that paragraph and I hope it is now correct, but please let me know if you see some mistake.
Dude you’re amazing, your prose is completely intuitive and easy to follow. NOW I can read that damned documentation and make sense of it.
Thank you slicia.io for the explanation